The manual is not very clear on how to check the chain tension. I mean, at first glance this doesn’t look obvious, and if you don’t know that “link fork” means “swing arm” in KTM lingo, this is even more obtuse.
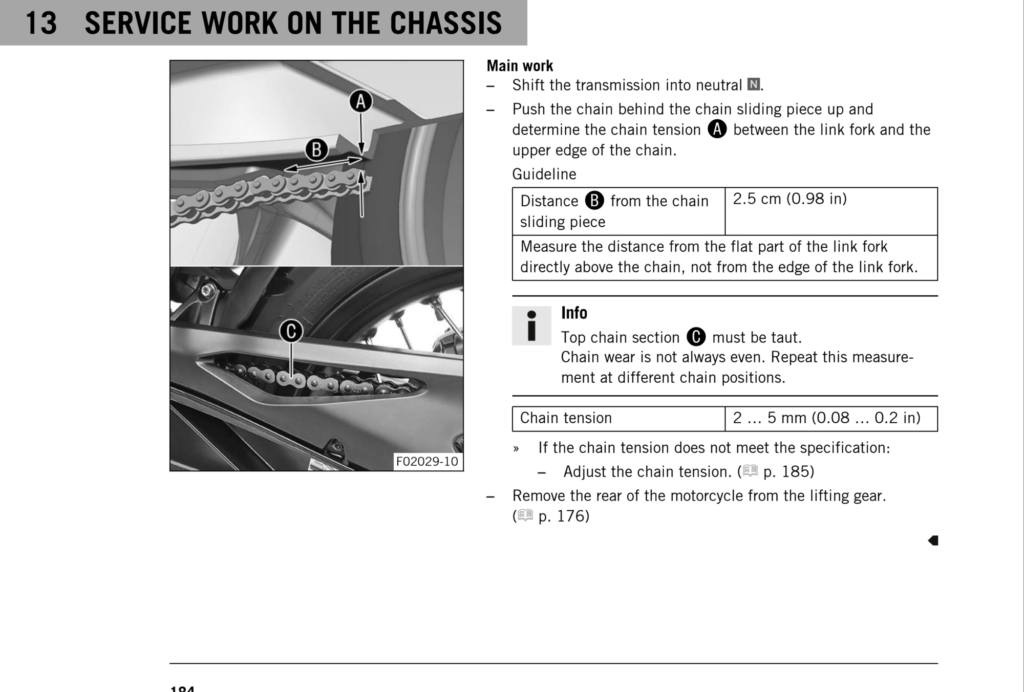
Manual page about chain tension
Also, to use this procedure, you need the rear lifted from the ground, from the swing arm with your favorite lifting gear. Using this procedure with a center stand or side stand will make the chain too loose or too tight!
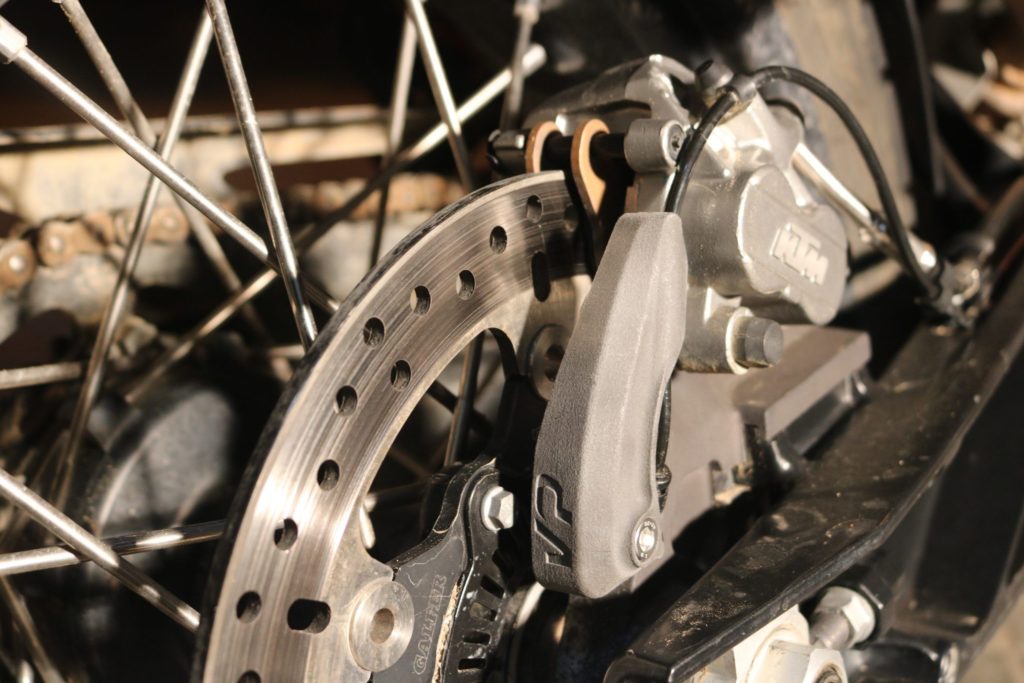
It’s not that complicated once the process is understood: with the top portion of the chain taunt to begin with, you lift the lower chain in the position they indicate at the rear end of the B arrows, 2.5cms after the end of the slide. The gap (‘A’) needs to be 2-5mm between the swing arm and the chain (source).
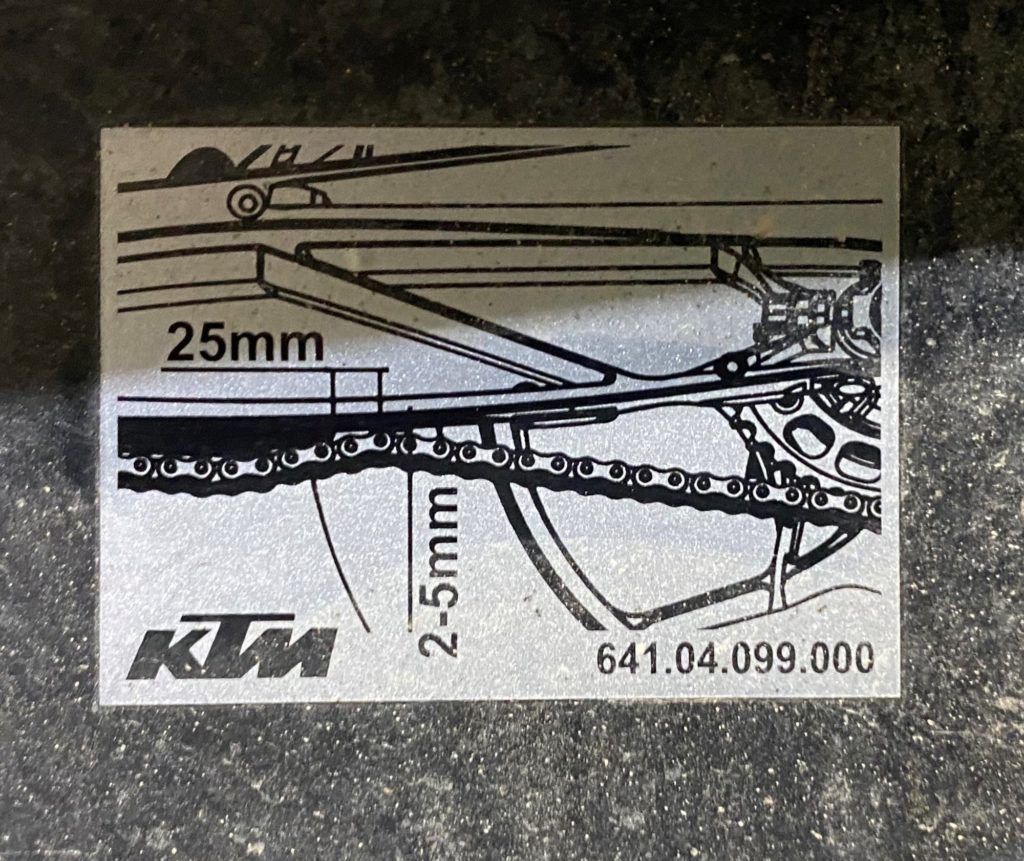
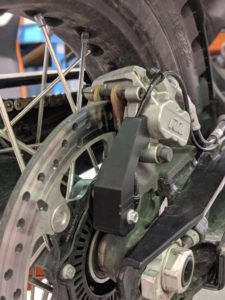
There is another view of the same method, this one documented on a sticker affixed to the swingarm:
If in doubt prefer a loose chain. At rest on the side stand, the chain should be very slack.
There are as many opinions about tires than they are pilots on the road. What tires to get? Well, it depends. This FAQ will not go into the trap of recommending a particular set.
Here is an exhaustive list of tires, most of them with a size compatible with the 790 (it’s in French, just ignore the text). It goes from 10% off-road to 95% off-road. Each notch sacrifices a bit of road manner to improve some off-road capabilities. Make your own choice.
The 790 Adventure R and Rally comes with Metzeler Karoo3 (Due to the M+S status of those tires, speed must be kept under 170km/h (106mph), as denoted by the ‘R’ speed rating in the tire denomination). The Rally version, due to its narrower rims and lack of air sealant, uses tubes inside those tires. The R version is tubeless.
Front 90/90-21 M/C 54R M+S TL
Rear 150/70-18 M/C 70R M+S TL
The 790 Adventure S comes with Avon Trailriders (Those are ‘V’ rated, up to 240 km/h – 149mph)
Front 90/90-21 M/C 54V TL
Rear 150/70R18 M/C 70V TL
Both share the same load index, 54 front, 70 rear, meaning a max weight of 212kg (467lbs) in the front, and 335kg (739lbs) on the rear. This should be plenty, and if you buy a new set, it must match or exceed those values.
For example (and this is just an example, not a recommendation!) the Motoz Rallz are available in the following size:
Front 90/90-21 M/C 54Q TL
Rear 150/70B18 M/C 70Q TL
Right size for the bike, and same load index of 54 and 70. Note that the rear tire is Belted instead of Bias ply for the Karoo3 and Radial for the Trailriders. But most importantly the speed is further limited to 160km/h (99mph) with these tires.
Using tubes on tubeless rims
On the front wheels, no issues in using tubes. On the rear wheel for the non rally models the valve is offset. A tube might work for a bit, but it’s not ideal, and may lead to the tube valve breaking. The only known way to solve this is to use the Motoz TUUOV 18-150-170, which has an offset valve (it’s also 4mm rubber, which is very very thick).
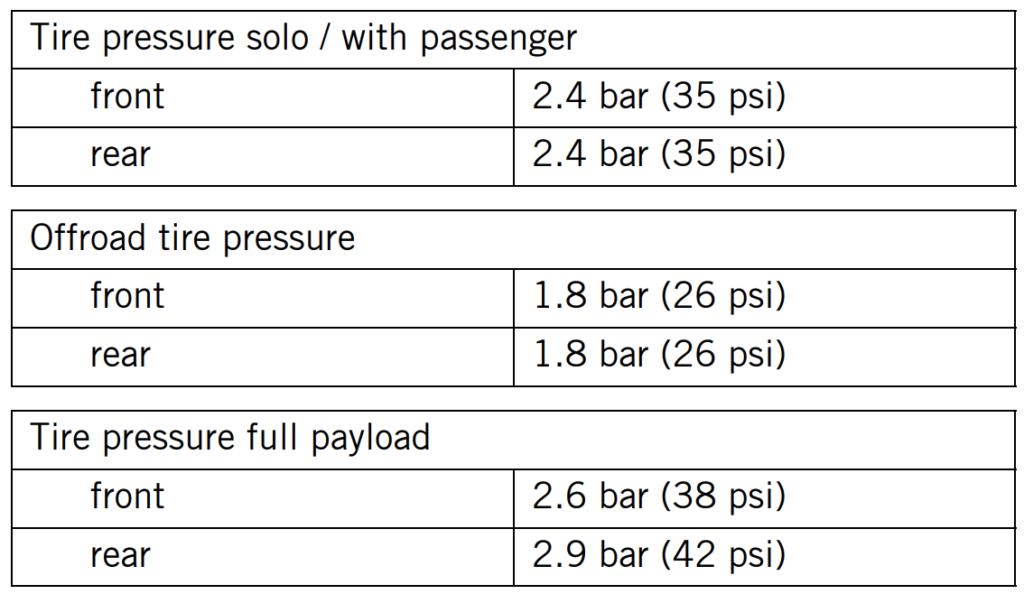
Tire pressure
It’s all in the manual, and the same pressure for all models (The S manual doesn’t mention off-road)
It is annoying to not being able to click the fuel cap back in place, you need to use the key to open and to close the cap. For people with a Scott Damper in place this is highly annoying as the cap is hinged forward: you need to use the key to open the cap, remove the key so it doesn’t hit the damper, open fully, fill the tank and then put the key back in the lock to close the cap.
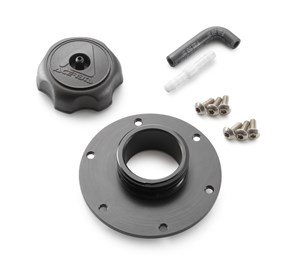
One solution is to install the KTM screw fuel cap (P/N 63507908044), but this means the tank is no longer locked (and the cap is not attached to the bike). Or get one from a powercell, CJ Design or slingshot racing.
KTM screw fuel cap (P/N 63507908044)
An excellent solution is a hack that allows for closing the fuel cap by just pressing on it, no key necessary. The key is still required to open the cap, but you can remove it right away as you don’t need it to close.
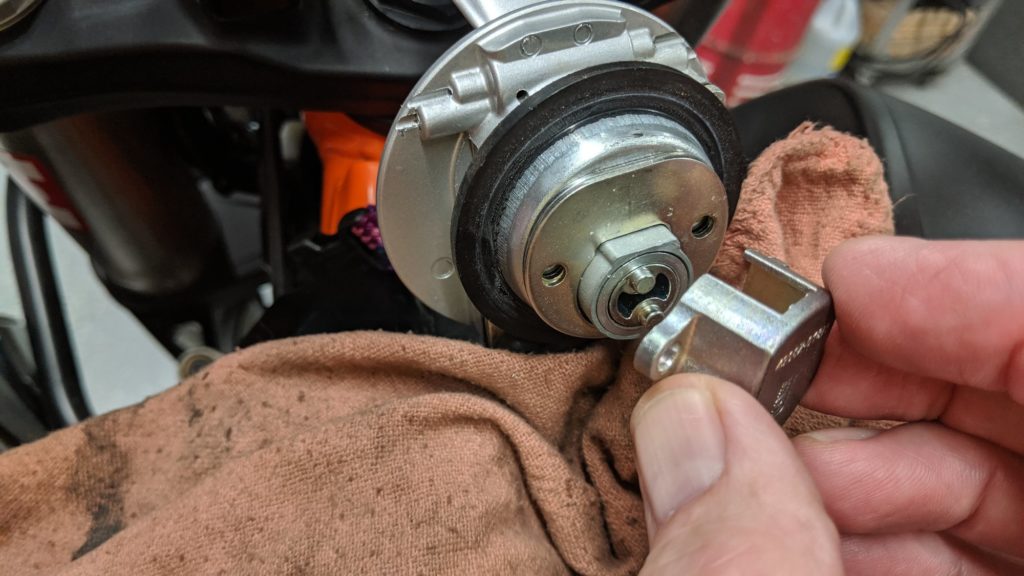
First you need to take out the 2 Phillips screws to remove the cover over the latch pawl: watch out the spring and pawl will probably go flying, as they did on this pic. This can be done on the bike, but make sure you cover and protect the hole so nothing can fell in the fuel tank. An alternative is to first remove the assembly from the bike.
Removing the cover
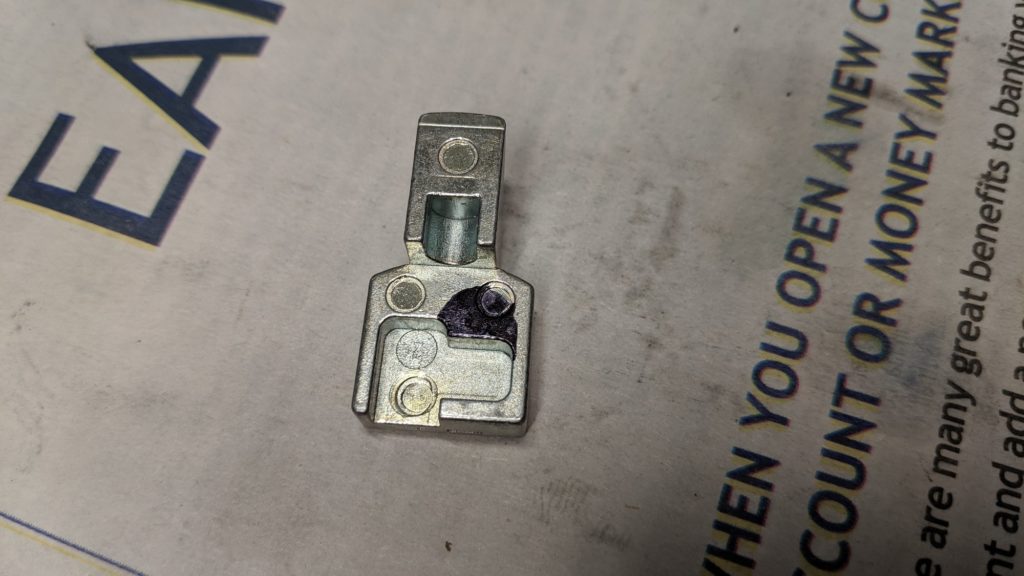
When you have retrieved the pawl and spring, take the pawl and mark the black area, which will have to be removed to allow the pawl to move when the key is removed:
Marked area to remove
Drill, grind, file with your favorite tools (drilling first to the floor, then dremel to finish seems the easiest way to do so) until you get to this result:
Expected result
You then reassemble the lock by carefully maintaining the spring and pawl in place while you slid and screw the cover back on top.
[This is all a copy of the AdvRonski hard work on AdvRider.com. All credits to him for the idea, the realisation and the photos, all on this post. And to Braaap! who followed the instructions successfully and encouraged me to put this in the FAQ]
Suggested to carry a spare side stand switch, after all they are cheap.
September 26 2020
Added a link to an awesome video showing breaking distances with and without ABS, using just the front or the rear, and using both in the ABS part of the riding mode article.
Added Sargent Seat to the Seat article, and reformatted it a bit while I was at it.
Updating the faulty ABS sensor article, linked it from the cruise control one, and added a bit about the possible cruise control failures, including the possibility of a broken clutch switch, detailed on the brake/cluch controls article.
July 20 2020
Added the CJ Design offer to the list of fuel caps.
Clarified a few articles, added links between the various articles on the fuel tank.
April 18, 2020
The confined edition: I don’t know about you, but I haven’t ridden in more than a month now. Stay at home, let’s beat this virus, so we can go ride again.
Fixed all the places where I used breaking instead of braking on the riding mode page. Plus some other very minor tweaks.
Of course there is an accessory from Touratech to use the useless grommet on the side stand wire…
Updated the pics for the heated grips to show the correct sizes.
March 15 2020
The rate of updates will slow down a bit, please continue to send me content, nothing is lost, it’s just taking me a little more time to update the site.
Moved some articles from one category to another: Horn and Aux lights to electrical, ABS cable protection to protections. Old URLs are redirected, your bookmarks are safe.
December 8 2019
Updated the power article with a link to a video showing how to dismantle the headlight.
Updated the price of the Chappel bash plate (It’s going down!)
Added a bit about the interaction of the cruise control with the traction control.
This site has been hacked a week or so ago. And was for a while serving spam according to some geo localization rules. Of course my own geo location was not targeted, so I didn’t notice at all… Thanks to the people who send me messages to let me know.
After a fine tuned scan of the site pages I found weird code in plenty of places. I still don’t know how the intrusion happened, but after cleaning up the mess I installed supplemental security measures, turned off a bunch of services I didn’t use, and buttoned up the installation.
If you were affected by the outage, please accept my apologies. I hate spammers, and being ambushed while visiting my site is not something I wished to happen.
October 27 2019
Updated centerstand with more details about the TrailStar gadget.
To protect the TFT from scratches there are multiple options. Note that the TFT screen is common with the KTM duke (125, 390, 790).
Speedo-angels provide possible solutions. Also available on ebay. Had some reports that “the Speedo Angels Dashboard Screen Protector for 790 ADVENTURE (2019+) 2 x Anti Glare are so bad I had to stop and peel it off half way through a ride because I couldn’t read the MyRide instructions on the screen”.
R&G makes one as well, available at revzilla among others.
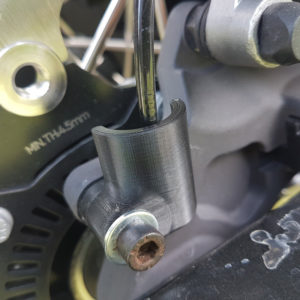
A less protective option, that protects the sensor but not snagging of the wire, is available from a fellow on the French KTMmania forums for 3D printing (registration required, French mandatory to understand anything). STL file is send on request…
The US (and Canada?) got ugly turn signals with halogen bulbs instead of the nice slim LED available in other markets. Probably due to some DOT regulations. Unfortunately KTM dealers in the US cannot order the EU parts. An outfit in Jersey used to ship them anywhere, but they no longer do KTM parts. If you find another source, let me know, I’ll add it to the FAQ.
OEM Windshieds in US are not the same as the one in EU, there are different part numbers. No idea what the difference is (Material? Impact resistance? Thickness?)
We use cookies to (1) ensure that we give you the best experience on our website and (2) to measure statistics about the site usage, anonymously. If you continue to use this site we will assume that you are happy with it.OkPrivacy policy

Recent Comments